Gardening Tips from Rosso Gardens | Seattle WA
The Best Plants to Grow in Spring
by Rosso Gardens on 05/06/12
Spring is a very busy time for a gardener and thanks to this great article from helium novice gardeners can relish in the wonders of the grden. The arrival of spring means the planting of most of the vegetables or flowers in most gardens. But before your spring planting, there are many tasks to accomplish. These will vary depending on the type of garden you have and other factors, but may include:
- Rake and clear away accumulated dead growth, twigs, leaves, and various winter debris.
- Remove tree and plant guards.
- Trim ornamental grasses.
- Prune rose bushes.
- Cut back evergreen plants.
- Edge flower beds so they are not overrun with grass.
- Do a thorough weeding.
- Clean any old perennials of their foliage. Replant any that have been heaved out of the ground by frost.
- Remove winter mulch.
- Add compost or manure to fertilize the soil for your new plantings.
Then when it comes time to plant, you want to be careful in your selections. There are some plants that are good to plant early in the spring, but there are some that are not hardy enough to handle the kind of drop in temperature that can happen in spring.
Of course this will also depend a great deal on your location. In some growing zones, spring still has plenty of sub-freezing nights. In others, spring is as consistently hot as other regions’ summer.
If you’re growing vegetables, consider the following for spring planting:
* Asparagus
Plant in early spring at a seed depth of 2-3”. Soak the crowns for three hours prior to planting. Asparagus grows well with a heavy phosphate fertilizer.
* BeansPlant in April or May at a seed depth of 1.5”.
* BeetsPlant in April at a seed depth of 0.5”. Plant another batch in June.
* BroccoliPlant in April or May at a seed depth of 0.5-1”.
* Brussels sproutsPlants can be planted in early spring. Brussels sprouts will survive a light frost. Seeds should be planted in the late spring or early summer at a depth of 0.25”.
* CabbagePlant in April at a seed depth of 0.5”. Cabbage grows well with a heavy nitrogen fertilizer.
* CarrotsPlant in April at a seed depth of 0.5”. Can then also be planted in the summer.
* CauliflowerPlant in May at a seed depth of 0.5”.
* CornPlant every two weeks starting in May at a seed depth of 1”. Plant close together in blocks rather than rows.
* CucumbersPlant in May or June at a seed depth of 1”.
* EggplantPlant 2 weeks after the last frost at a seed depth
by Philo Gabriel
HOW TO PLANT SEEDS
by Rosso Gardens on 04/28/12
Here are some helpful tips from Sunset Magazine. A leading resource in the Gardening world!
Vegetables like tomatoes, peppers, and eggplant, need a long, warm growing season to produce a harvest.
If you plan to grow your own seedlings, start such crops indoors in late winter in order to have plants ready to set out in the garden when the weather has warmed up.
If you want to plant tomato seedlings in May, for instance, you'll need to start those seeds by early March.
Veggie 101: How to start your garden
Starting seeds in containers is also a useful way to have plants of cool-season crops, such as broccoli and cabbage, ready to transplant into the garden in early spring or fall.
You can use a variety of containers, including flats or trays (with or without dividers), small individual pots, and cell-packs. If you’re reusing old containers, scrub them out, and soak them for half an hour in a solution of one part household bleach to nine parts hot water to destroy any disease organisms.
Seeds to seedlings
1. Fill 4-inch pots to just below the rim with a light, porous seed-starting or potting mix. (You can make your own mix by combining 1 part each of peat moss, vermiculite, and perlite.) Moisten the mix, and let it drain.
Scatter seeds thinly over the surface. Check the seed packet for the recommended planting depth, and cover the seeds with the proper amount of mix. (As a rule of thumb, cover seeds to a depth equal to twice their diameter.) Label each container with the plant’s name and the date. Moisten the soil lightly.
If you are starting heat-loving plants (tomatoes, cucumbers, eggplant, okra, peppers, squashes, or melons), set the containers on a water heater or use a heating mat to keep the soil between 75°F/24°C and 90°F/32°C. (Most cool-season vegetables will germinate at room temperature.)
When the seeds germinate, move the pots into an area with bright light and temperatures between 60°F/16°C and 75°F/24°C.
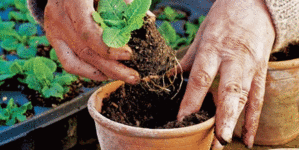
2. When the seedlings develop their second set of true leaves, it’s time to transplant them to individual pots, such as 3- or 4-inch plastic pots. Fill the new containers with potting mix, moisten the mix, and let it drain.
To remove the seedlings from their original pots, squeeze each pot’s sides, and turn it upside down, keeping one hand around the soil ball. With both hands, carefully pull the soil ball apart, and set it down on a flat surface.
3. Separate the fragile rootballs of the seedlings from one another with a toothpick or skewer, or tease them apart with your fingers.
4. Poke a hole in the new container’s potting mix. Carefully lift each seedling and its rootball, keeping your fingers under it for support. Place the seedling in its new container, and firm the mix around it. Water immediately, and then set the pots in bright light (but keep them out of direct sunlight for a few days). Feed the seedlings weekly with a fertilizer sold for starting seeds or with a liquid type diluted to half-strength.
Give them warmth and light
Seedlings of edible crops need bright light to develop properly; when grown in conditions that are too dark, the seedlings are spindly and weak. If you don’t have a suitable place for your seedlings, try growing them under fluorescent lights. As soon as the seeds sprout, give them 12 to 14 hours of light each day, setting the light fixture 6 to 8 inches above the tops of the plants.
Seeds of heat-loving summer crops need warm soil to germinate quickly and strongly. Thin waterproof heating mats placed under the containers keep the soil 15 to 20°F/8 to 11°C above room temperature.
Nurseries and mail-order catalogs offer both fluorescent light kits and heating mats.
Avoid "damping off" trouble
If your seedlings suddenly collapse and die, one of the fungal diseases called "damping off" or "seed and seedling rot" may be to blame. In one type of damping off, the seedling's stem collapses at or near the soil surface; in another type, the seedling rots before it emerges from the soil, or the seed decays before it even sprouts.
To prevent these problems, use pasteurized potting mix and new or thoroughly washed and disinfected containers.
Take care not to overwater seedlings; be sure to provide good air circulation and ventilation, so tops of seedlings stay dry and standing moisture is kept to a minimum. Thinning seedlings to eliminate crowding is also helpful.
Gardening in the Rain
by Rosso Gardens on 04/20/12
Here's some great insight from the NCMG.
Some people sing and dance in the rain, but we're gardeners, so we go out in the garden!
If you haven't done it yet, get with it! When it's raining, the garden is a wonderful place to be for any number of reasons.
- There usually are NO bugs!
- If you're bothered by the heat when you garden, this will be perfect, 'cause it's cooler.
- You probably can get away with not watering newly planted things for a bit.
- The soil stays where you PUT it!
- The shock to newly planted materials is so much less.
- No one will bother you!!!!
- Everyone will think you're crazy (which you knew already.)
- Other gardeners will know now that you are serious about this.
The Right Gardening Tool for the Job
by Rosso Gardens on 04/06/12
By Marie Iannotti, About.com Guide
Here's a sampling of garden tools to start filling your toolshed.
- Shovels: Garden shovels have round, pointed blades. They're absolutely necessary for moving soil, digging holes and planting.. Look for one with a flat edge at the top of the blade. It provides a better surface for your foot. Here's a sampling of what to look for in garden shovels.
- Trowels: Most planting will require you get down on your knees with a trowel. Steel blades will last longest. Handle choice is a matter of personal preference. Soft rubber handles are easier on the grip. There are also ergonomic designs that take the stress off of your wrist. A narrow blade is good for digging in solid soil. Wide, rounded blades remove soil faster. You will probably wind up with a couple of different sized trowels in your tool shed. The trowels described in this article are top picks.
- Pruners: Pruning, deadheading and shaping plants goes on all year in the garden. Good pruners will not only make your job easier, it will make a cleaner cut on the plants and not tear or rip. Basically there are 2 types of pruners: anvil and bypass. Get description from preference. Look for pruners with replaceable parts and blades that can be sharpened. Pruners can be costly, so try holding a few different pruners to see what feels comfortable in your hand. These are some of the best by-pass pruners.
- Hoes: Weeds are a fact of gardening life. Hoes can make quick work of weeds. They can also be used to break up soil that isn't to compacted. For strength, look for a rolled steel blade that is riveted to the handle. Smaller blades allow you to get in between plants. Here's a sampling of garden hoes.
- Garden forks: Nothing works as well as a fork to break up soil. Garden forks are slightly shorter and thicker than pitch forks. The strongest have square, rather than flat tines. A garden fork can usually take the place of a spade, if it's the right type of fork. Here are some garden fork examples.
- Rakes: Yard rakes will help you get fall’s leaves
out of your gardens and also collect all your garden debris. Tines
with some spring can be used in the garden without too much damage to
plants. A narrow rake can maneuver around plants easier, but a wide
rake makes quicker work of leaves. As with trowels, many rakes now come
with ergonomic handles that put less stress on your back.
You will also want a heavy metal rake. These are long and straight with teeth about 3" long. They are necessary to smooth out newly tilled garden soil and break up clumps. Take a look at the variety in garden rakes.
- Wheelbarrows & Carts: Toting things
around the garden can really become a chore without the aid of a
wheelbarrow or cart. Plants, soil and compost all have to get to your
garden somehow. The size of your cart will depend on the size of your
garden. While bigger may seem better, don’t get something so large it
becomes to heavy when full for you to move. Some things to look for in a
wheelbarrow are: a stale stance, handles that extend all the way to the
tire, an air filled tire and a deep tray. If you can afford it, o for
the heavy-duty contractor’s model or at least something with a
reinforced undercarriage.
two-wheeled garden carts are becoming more and more popular because the two wheels makes for a more stable ride with heavy loads. Look for large, spoked wheels for a smooth ride. Deep buckets are good for dumping. Flat beds are preferable for shoveling out of the cart. These are some of my favorite wheelbarrows and carts.
- Water cans and Hose: You can’t count on rain.
A good watering can will have a handle that balances in your hand.
Handles that curve from the front of the can to the bottom make it
easier to tilt. Again, large may seem better, but don’t get a can that
is so large you can lift it when full.
When it comes to hoses price is often an indication of quality. Points to compare start with burst strength or how much pressure a hose can handle before it bursts open. 50 pounds per sq. inch is a good strength. The wider the hose, the more water can flow through it. ½ inch is fine, but 5/8 inch is better. Finally there is the material the hose is made from. Rubber will withstand the weather better, but the important thing is that whatever the material,,, it bee reinforced with a mesh layer. Finally, look for one that claims to be kink resistant, to make your life easier. Here are my top picks for hoses, hose reels and watering cans.
Some Suggestions
- Forged tools will cost more, but they are more durable.
- Long handles provide more leverage. Short handles provide ore control, but can be hard on the back.
- Use a steel brush to clean off tools after each use.
- Keep handles from drying by rubbing with linseed oil.
- Sharpen your tools before storing for the winter. Protect with a coat of oil, wax or petroleum jelly
- Check and tighten screws and fasteners often.
Spring Gardening from The Helpful Gardener
by Rosso Gardens on 03/17/12
So it's snowing days before the start of spring....big deal. Here in the pacific northwest that's normal. Every season brings a different set of chores in the garden. Spring is
an exciting time for gardeners! It can
also, however, be a bit overwhelming to know how to prioritize your gardening
time at this time of year. Here is a helpful list of chores that should
be tended to in the spring. Brought to you from the Helpful Gardener.
Pruning
For early blooming shrubs such as forsythia and viburnum, prune
them as soon as blooms have passed. Early spring is also an ideal time
to prune your roses.
Deadheading
Remove spent flowers from bulbs, but leave the rest of the plant as is
for the time being.
Weeding
Pull weeds from your beds and borders before they have a chance to take
hold and spread.
Composting
Tend to your compost if it has been neglected over the winter.
If you do not have a compost bin, spring is a great time to start one.
Tools
Spring is a good time to prepare your tools
for the oncoming gardening season and to make any necessary repairs or
new purchases. You will be happy you have done so when summer sets in.
Plant
Spring is a great time to add new plants to your garden. Be sure,
however, that all threat of frost has past. Plant such things trees, shrubs,
hardy annuals, and summer blooming bulbs.
Fertilize & Mulch
Fertilize and mulch beds and borders. Spring is also a good time
to fertilize fruit trees. If you applied heavy winter mulch for protection
from the cold, you will need to clear it away.
Staking
Stake plants that may be prone to wind damage during the unpredictable
spring weather.
Lawn Care
Spring is the best time to start a new lawn from seed. For established
lawns, you should start mowing in the spring, but don’t initially
cut the grass very short for the first few times.
Of course, whether you start these chores in early, mid, or late spring depends on the climate where you live, taking in to account such factors as when the threat of frost has past or when the ground is thawed enough to dig. I hope these tips will give you a good idea as to where to focus your attention in your garden this spring. Enjoy!


